The Norinco M14 is an undeniable success. One of the most common black rifles in all of Canada, its popularity is the combination of both its attractive price tag, practical chambering, and non-restricted status. To top it off, it is also extremely reliable and moderately accurate, and surprisingly well made for given the price point. With a forged receiver, decent barrels, and the robust action designed by fellow Canadian John C. Garand it is without a doubt one rifle that most Canadian gun enthusiasts should have in their safe at some point.
But while the stock rifle is a solid performer right out of the box, its performance can be dramatically improved with some slight modification and tuning, the most basic of which can be accomplished with very little expense and time. So, while we certainly do have big plans for our Norinco M14 that include an awesome Canadian chassis system, we thought we’d kick it off with four of the best modifications you can make to any new Norinco M14 that cost next to nothing.
Op-Rod Spring Guide
Time: 2 minutes.
Cost: $40
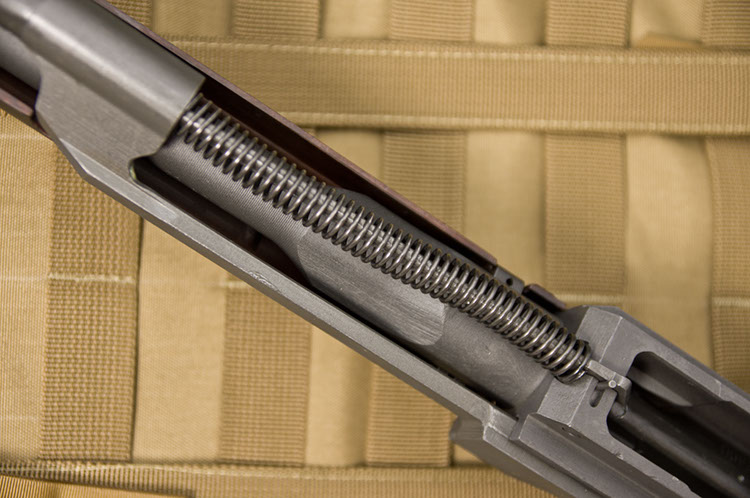 The first, and perhaps most well-known modification is also the most expensive we’ll cover in this issue; the replacement of the stock op-rod spring guide. The stock piece, being constructed of a simple single stamped piece, serves to provide the recoil spring with a guide as the action cycles. It is readily accessible when the action is removed from the stock and is clearly visible on the bottom of the barreled action.
Because the stock guide does not fill the internal dimension of the op rod spring completely, the spring fits over the guide imprecisely and forms a wave to the left and right. As the action cycles, this spring pops back and forth continuing the wave motion, which in turn leads to the bolt returning to battery inconsistently. It essentially creates a situation in which the spring pushes the bolt to the left and right as it traverses rearward. Due to the looseness of the Garand-style action, this means the bolt may be seated slightly to the left or right when it returns to battery, which in turn decreases accuracy.
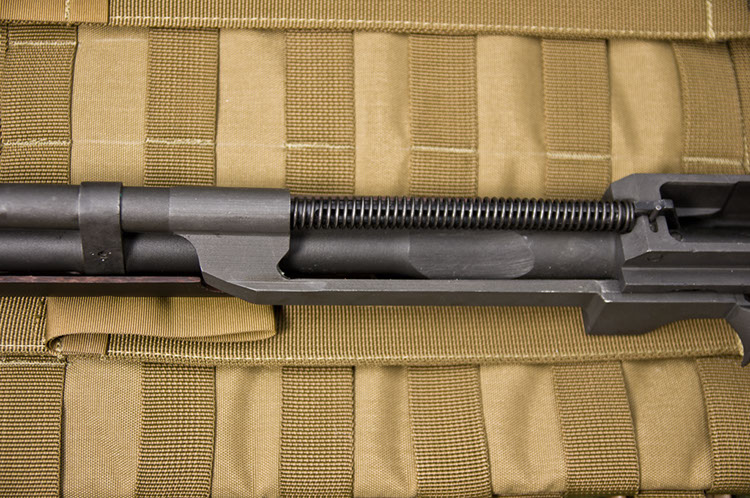 The solution is as simple as removing the stock spring guide and installing an aftermarket one. These are typically machined rods with an external dimension that matches the stock op rod spring. Interestingly, most Norinco or Polytech m305 or M14 rifles have op rod springs that are slightly smaller internally than their American-made counterparts, so while some US market spring guides can bind up most of the guides available on the Canadian market have been made specifically for the Norinco spring dimensions. Some are more precise than others, and others boast excised portions or fluted sections to keep their weight down, but realistically it’s not crucially important which brand or manufacturer you opt for. As we had procured a Blackfeather chassis from M14.ca here in British Columbia, we’ll be installing one of M14.ca’s guides.
The installation for this piece is dead-nuts easy. Simply remove the barreled action from the stock, and with one thumb holding the tail end of the spring guide into the action, slide the retaining pin to the side. Then, securely grasp (and that part’s key) the spring and guide, and lift the guide up and out of the action. Then, simply remove the stock stamped part, lightly oil the new piece and slide it home. In the case of our part from M14.ca, the tailpiece finish made it slightly too tight a fit for the dovetail in the receiver, so some slight stoning was required to get a nice, snug fit. Once installed, the spring fits perfectly over the guide, with as little displacement left and right as possible. This will create a more reliable action that opens and closes in a more repeatable fashion for greater accuracy.
Valve Compound Trigger Job
Time: About two hours, depending on the movie.
Cost: $7
One of the really bright spots of Norinco M14 ownership is the design of the trigger. The last rifle design endorsed by the US military before they made the transition from the ethos of small volumes of accurate fire to the wholesale expenditure of ammunition in the general direction of an enemy, the military M14 can be seen as the last general issue military rifle that really put an emphasis on marksmanship. In fact, the M14 is such a great marksman’s rifle that during the various conflicts in the Middle East, US armed forces withdrew scads of M14 rifles from storage for use as designated marksman’s rifles. And a key component in a marksman’s rifle? The trigger.
 Unfortunately the Norinco M14 trigger leaves a lot to be desired when the rifle is brand new out of the box. The simple fact of the matter is that triggers are one area in which small gains require infinitely more precise machining processes. In other words, the difference between a trigger that’s very good and one that’s merely passable is a relatively large amount of investment on the manufacturers’ part… and that’s not exactly Norinco’s modus operandi. But as an owner, it’s possible to improve the Norinco M14 trigger by following one of two ways. The first, and certainly better way is to completely disassemble the stock trigger and carefully stone the hammer and trigger hooks until they are perfectly mated and perfectly polished. This method requires careful attention so as to maintain the correct angles so that you do not adversely affect the trigger’s ability to retain the hammer while simultaneously trying to alter the mating surfaces just enough to lower the trigger pull weight. Simply put, we’re not that good, so we prefer option two: valve grinding compound.
See, one of the main reasons the stock trigger pull on a new Norinco is so terrible is simply because every surface within the trigger mechanism is parkerized… including the hammer and trigger. That makes the mating surfaces where the two pieces slide across one another only slightly less gritty than if they were coated in sandpaper. Over time, they will wear together, but who’s got time for that?
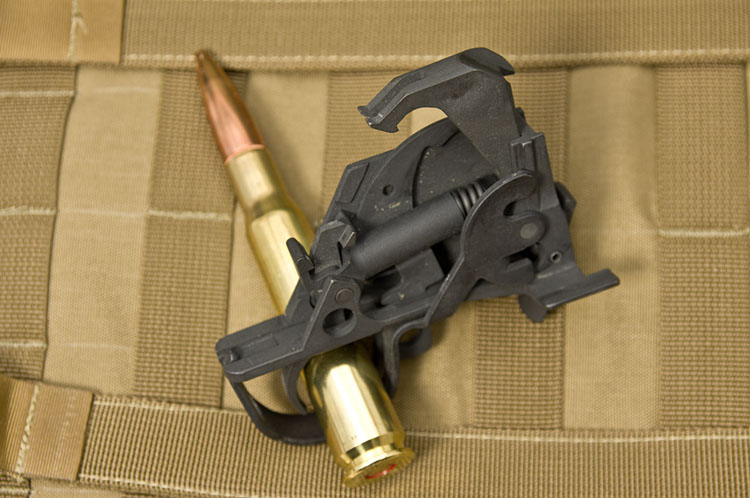 The first step in doing this particular improvement is to remove the trigger assembly and close the trigger guard back up. Then, while putting pressure on the hammer with one hand, depress the trigger to release the hammer. With the hammer in the upright position, liberally smear the hooks on the disconnector, trigger, and hammer valve grinding compound available at any auto parts store. An oily liquid with abrasive material in suspension, it is basically an extremely abrasive version of polishing paste. With that done, settle into your favourite easy chair and turn on a good movie while you spend the next couple hours or so of your life dry-firing the trigger assembly, with short pauses to reapply more compound as needed. The only thing to keep in mind while you do this is to ensure that while you use one hand to soften the hammer’s release, you do not want to put any pressure on the hammer when it is cocked; you’re relying on the pressure of the hammer spring to press the trigger and hammer hooks together to allow the valve grinding compound to wear away the parkerized surface.
After a few hundred repetitions, use Q-tips or a rag to wipe the hooks off, and examine their surfaces. When you see no remaining parkerized steel, you can choose to clean the valve grinding compound off and replace it with a polish compound to further decrease friction between the surfaces, or you can simply stop there and lubricate the trigger assembly for re-installation into the rifle. Of course, your decision may be made substantially easier depending on the condition of your significant other’s sanity after they’ve listened to the endless “click, click, click, click” of the trigger assembly being worked for however long it takes to remove the parkerized material.
Although this modification will certainly improve the trigger pull weight (especially if you really spend some time working and polishing the pieces together) the main improvement will be to the trigger’s quality. When finished, the first stage should be significantly smoother, with the break being much crisper. On ours, the difference was night and day, even without using any polishing compound.
Gas System Shimming
Time: 1-2 hours.
Cost: $15
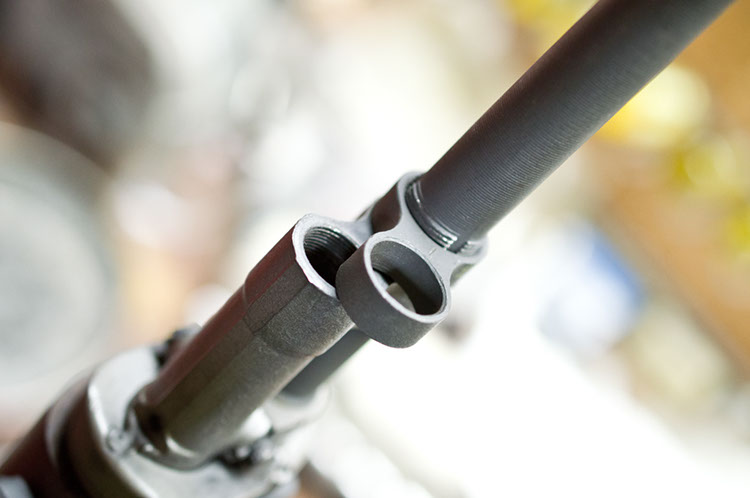
Shimming the gas system is a task that, while not being necessary for all Norinco M14 rifles, is something that many can benefit from. How do you tell if your rifle is one requiring this particular task? Simple. Undo the gas cylinder plug and loosen the gas lock. Then, reinstall it, and take note of where you begin to feel friction between the gas lock and the gas cylinder. Ideally, the gas lock should begin to snug up somewhere between 4 and 5 o’clock. If your gas lock does not, and can be readily turned to 6 o’clock and past the gas cylinder entirely, you may need to shim the gas cylinder.
 This task is somewhat more involved and undeniably more daunting to those unfamiliar with the Norinco M14 rifle but it’s readily tackled with some standard hand tools. Seeing as this particular task requires removing the gas system, the first thing required is the removal of the flash hider. This is accomplished by first removing the set screw positioned ahead of the front side and atop the flash hider. With that removed, a pair of M14 castle nut pliers can be used to spin the castle nut off ( pair of those wide-mouth vise grip pliers can work as well), or a small punch and a hammer can be used on the castellations to accomplish the same task with more care. Once the castle nut is loosened, spinning it by hand and pulling forward lightly on the flash hider will have it removed in no time. We say all this with the assumption that the Norinco M14 in question is like ours and at least as new as 2011, as some batches manufactured before that have the flash hider tack welded on, and if that’s the case then a substantially more difficult and lengthy process must be used. If your rifle has a welded flash hider search Youtube for an excellent guide to removing it.
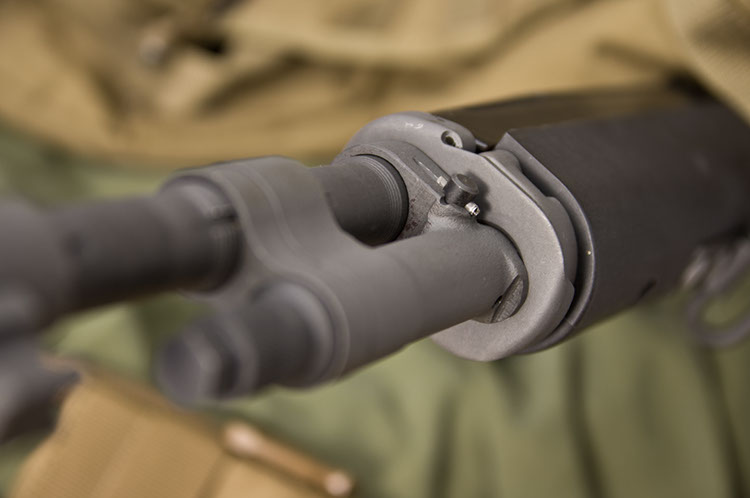
With the flash hider removed, spin the gas lock off, and remove it from the barrel. But before you do anything further with regard to removing the gas cylinder, try reversing your gas lock and reinstalling it. In many cases, simply turning the gas lock around allows it to be threaded on and snug up properly. If your rifle’s gas lock remains either too loose or too tight (if the gas lock begins to tighten at 3 o’clock or sooner, it can end up being too tight and putting undue stress on parts, leading to worse accuracy) then you need to simply pull the gas cylinder off the barrel and install shims behind it. The gas cylinder is removed by pulling it straight forward off the barrel with no twisting or rotating required. This will require the action to be removed from the stock.
With the gas system now removed, begin test fitting shims by installing the thinnest shim on the barrel, and then sliding the gas cylinder back on and threading the gas lock on. Continue to fit thicker shims until the gas lock tightens up properly. Since you have the gas system apart anyway, aim to have the gas lock snug up precisely at the 5 o’clock position, and once you find the shim that accomplishes that, remove the gas cylinder one last time. With the gas cylinder removed, find a small drill bit or 1/16th inch allen wrench into the gas port on the barrel. Then reinstall the gas cylinder, and insert the drill bit or allen wrench into the gas port on the bottom of the cylinder, and look down the bore to see if the drill bit or allen wrench protrudes directly into the barrel. If it does not, try to move the gas cylinder slightly left or right until it does. If you need to do this, your gas ports are not properly aligned, but unfortunately there isn’t much to be done about it short of replacing barrels or gas cylinders. Once that’s accomplished, if you have a unitized gas system, you can install the gas lock and plug. If not, you should reinstall the stock first, and then install the gas lock and plug to allow the stock ferrule and barrel band to find their most neutral position. This is a basic step to accurize M14 rifles.
Gas Unitizing
Time: 5 minutes of actual work.
Cost: Six-pack to $25
Spea king of gas system unitizing, if you do not know what this process is or what it means, then let us begin by saying that if you do one thing to accurize your Norinco M14 it should be this.
 The practice of unitizing the gas system on an M14-pattern rifle is almost religious in nature, delivered unto us poor plebian civilian marksmen by the US Army and US Marine Corp rifle accurizing guidelines. Used on all Army Marksmanship Unit and Marine Corp Shooting Team rifles, this practice entails somehow affixing the barrel band (located on the barrel aft of the gas cylinder) and the gas cylinder together. And seeing as this process was largely popularized by the US Army and the US Depart of the Navy (of whom the Marines are a member) it should come as no surprise that there are two very different schools of thought on the matter.
One process, the US Army process, is to screw the barrel band into the gas cylinder with machine screws. True to the Army’s way of doing things, this process sounds ridiculous easy, but is in fact ridiculously difficult. This method requires the annealing of the spindle valve located in the gas cylinder so as to allow it to be drilled and tapped for screws, then it requires the very precise drilling and tapping of two holes, all before the fitment of two not exceedingly common screw sizes. Thankfully, the US Marine Corp excels at nothing if not simplicity, and realized that it was much easier to simply tack weld the barrel band onto the gas cylinder. For obvious reasons, the Marine Corp method is far more popular.
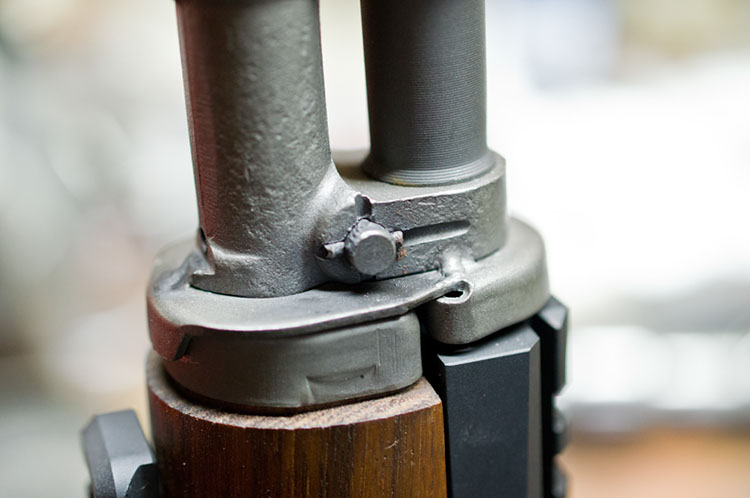 Unfortunately, due to the materials used in the gas cylinder and barrel band, it is recommended that these pieces be TIG welded. As a result, in most situations, it’s probably best to take the job to a professional, unless you can find the Best Tig Welder machine. When it comes to weld placement, there are two options: The first and most common in Canada is two welds at roughly 2 and 10 o’clock, and a third tack weld at 6 o’clock on the exterior of the gas cylinder. This method is popular because it allows the rifle to be assembled, and the for reference marks to be made with a punch on the gas cylinder and barrel band indicating their respective locations. Then the gun can be taken apart and the gas cylinder and barrel band welded up in the “neutral position” they naturally found themselves in on the rifle. The second method involves welding the barrel back to the gas cylinder on the backside of the barrel back, where the gas cylinder protrudes rearward through it. This hides the welds externally.
So why is this such an important process in accurizing an M14-style rifle? Because the Norinco M14 has a relatively long and narrow barrel profile with a very heavy and aggressive gas system and op-rod hanging off it, it is very susceptible to being influenced by the movement of the gas system. By firmly affixing the barrel band to the gas cylinder the barrel is constantly held under slight tension by the forestock. This adds a remarkable amount of stability, as the solid connection of the barrel band to the gas cylinder essentially allows the stock to support the barrel, through the stock ferrule. Granted, it runs counter to the far better-known notion that barrels should be isolated and free-floated whenever possible, but the fact is that the Norinco M14 barrel cannot be free-floated; too much of the action hangs off of it. So, given that, you’re far better off to try and utilize the rifle’s stock to help isolate any uncontrollable movement in the barrel and action.
Stock Replacement
Time: Between 7 days and 60 seconds.
Cost: $100-$2,000
Which brings us to either the first or last thing most Norinco M14 owners do. Coming out of the box in either a wood stock of unknown origin or, more commonly, a flimsy black plastic stock, Norinco M14 furniture is not exactly pleasant to behold. And when it comes to things like unitizing gas systems and the like, neither of the available factory stocks are really capable of providing the beefy M14’s action with enough rigidity to allow the rifle to realize its accuracy potential.
One way to solve this is with a specific chassis system. Compared to a conventional stock, chassis systems such as our Canadian-made Blackfeather system or Sage’s EBR system provide greater support for the action by being both stiffer due to their all-metal construction as well as lending greater rigidity to the rifle by incorporating the op-god guide into the chassis mounting system. These systems are also noteworthy because they typically add a lot of versatility to the rifle, incorporating various buttstock options (folding, telescoping, etc), a multitude of rail options, and even change the way the rifle handles by mounting the action lower in relation to the buttstock. Most importantly though, their incredible stiffness and increased mounting points makes them the most accurate action mounting systems available. The only downside to these systems is their cost. Using a bunch of unique parts and being machined rather than molded or carved they are more expensive than conventional stocks. The Blackfeather chassis we will be installing in the next issue carries a retail price of $639 Canadian while the Sage system is both hard to come by north of the border and can easily run north of $1,000 depending on the options selected.
For those looking to keep their Norinco M14 build on a slightly slimmer budget, the options are three-fold: Any number of aftermarket polymer/plastic stocks from companies like Archangel, a conventional walnut stock, and surplus fiberglass USGI stocks.
Plastic stocks like those from Archangel have a few things going for them. Obviously the looks-cool factor is high with them, and they tend to incorporate a large amount of user-interface features; adjustable cheek risers, rail sections, and the like. However, while they do improve upon the rigidity of the factory ChiCom stocks, they are nowhere near as stiff as the other options. Furthermore, many of they are not terribly cheap, with most prices hovering in the $200 range.
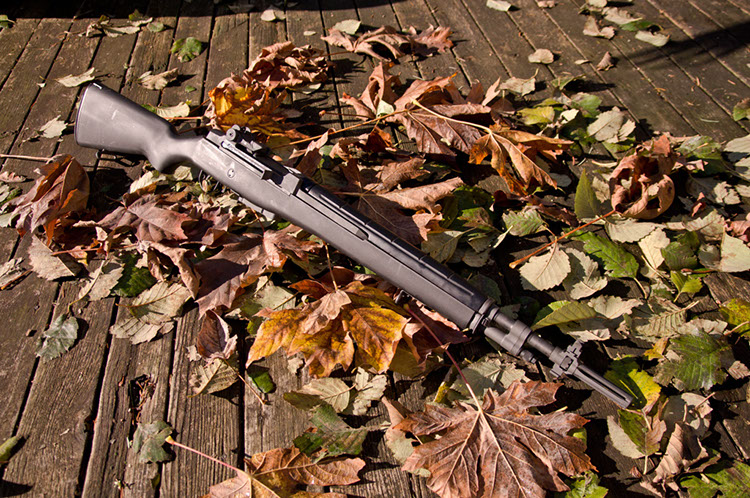
The next option, walnut, is almost the polar opposite. Basic, stiff, durable, but almost bereft of “features,” a walnut stock such as that which is pictured on our existing M14 scout-style rifle can be had for $100 from a US supplier like Boyd’s, or even less if you take advantage of a sale or purchase a stock unfinished. It’s important to note, however, that walnut stocks are divided up into two main categories: Civilian aftermarket (like our Boyd’s stock is) and surplus. The difference is that surplus walnut stocks will have a cutout for the fire selector on the right-hand side. As Norinco M14 models do not have a fully automatic fire mode, they have no fire selector, so fitting a Norinco into a surplus stock will leave a small hole on the side of the stock. Commercial walnut stocks do not include this hole, and can even be ordered in varying grades of walnut burl for those so inclined, although prices do increase commensurately. But there’s definitely something undeniably attractive about an Norinco M14 sitting in an attractive wood stock!
The final option is a surplus USGI fiberglass stock. These stocks are available from a myriad of online sources for $100 or less and thus readily exportable from the United States. Some of the stiffest and most durable stocks available for Norinco rifles, surplus fiberglass stocks provide an excellent foundation for an accurate rifle, but may require some light fitting work to get the action to seat completely. Furthermore, being surplus military stocks, they too will have the unsightly selector hole on the right side but at least it can be filled with epoxy and painted over. But for $100 or so, they are the undeniable value leader for those that put performance above all else, and have no desire to fit additional components like rails and other accessories.
Added up, all of these modifications can be done for less than $200, and that’s only if you need absolutely all of them and have none of the supplies. Chances are good that won’t be the case. Once completed, your rifle will feel better, look better, and most importantly shoot better. How much better? Well, in our experience with fiberglass and walnut stocked rifles shooting ammunition reloaded specifically for the M14-style of rifle, groups can shrink by as much as half of what the rifle shot before being tuned up. Generally speaking, that should correlate out to somewhere in the neighborhood of 3 MOA or better with high quality factory ammunition, and about 2 MOA or slightly better with custom reloads if you’re lucky enough to get a good shooter out of the box. Of course, the quality of the specific barrel and your bolt headspacing plays a role, but given the relatively low cost of many of these improvements they’re typically well worth it… and how better to pass these cold winter nights than with some quality tinkering, eh?

 SUBSCRIBE TO CALIBRE MAGAZINE
$30.00 / year
SUBSCRIBE TO CALIBRE MAGAZINE
$30.00 / year
 UNAPOLOGETICALLY CANADIAN MEN'S T-SHIRT
$29.00
UNAPOLOGETICALLY CANADIAN MEN'S T-SHIRT
$29.00
 UNAPOLOGETICALLY CANADIAN WOMEN'S T-SHIRT
$29.00
UNAPOLOGETICALLY CANADIAN WOMEN'S T-SHIRT
$29.00