
While we here at Calibre are obviously appreciative of the opportunities this unique job grants, we haven't forgotten what it's like to nurture a penchant for fine firearms on an SKS budget. And unless Time or Newsweek suddenly expresses an interest in purchasing this particular Canadian gun magazine, that's not liable to change, either. Because while we may punch a slightly different clock than most, we here at the Calibre offices remain regular old working stiffs, and our own personal approach to firearm procurement (or rather, the lack thereof) reflects that... at least, we think it would, if our significant others would allow us to actually buy any new guns.
But while our pitiful bank accounts may restrict us from entering the heady world of fine or exotic gun ownership, even we can afford to spend a few hundred bucks on the hobby now and again, and more often than not we spend that money modifying, accessorizing, or otherwise building one of our pedestrian rifles into something that we feel more strongly about. However, if there's one style of rifle that has historically eschewed our piecemeal approach to gun-building, it's been the long-range precision rifle.
And here's why: gunsmithing time. Requiring incredible attention to detail and the use of such dark arts as action truing, barrel fitting, lug lapping, action bedding, and chamber cutting, building an accurate rifle used to be something that simply couldn't be done outside the walls of a gunsmith's shop. But, with OEM manufacturing tolerances growing ever smaller, and aftermarket manufacturers recognizing a growing demand for modular design, with each passing year it grows ever easier to build a long-rang precision rifle entirely at home. So, we thought it was about time to give it a try.
The first order of business, obviously, was to purchase a rifle. And after perusing the various used gun listings, we found this plain-jane Stevens 200 on gunownersofcanada.ca, with a listed price of $350. Advertised as a .308 fitted with a very nice Farrell mount and an oversized bolt handle, it seemed perfect for our needs, as .308 was the very cham
bering we were looking for, and both the mount and bolt handle were additions we were intent on making. So, one quick email money transfer and one slightly less quick Canada Post shipment later, we were happy to call it our own.
Now, we should mention that the Stevens 200 we bought wasn't selected merely out of convenience. No, we had already decided on a Savage action as we've long been fans of Savage's floating bolt head design that precludes any need to lap the lugs, and we also knew we'd want to replace the barrel at home, making Savage's locknut-style of barrel retention vastly more appealing than that of the Remington 700, which requires machine work, and thus, a gunsmith's time. Furthermore, since this was to be a project rifle, we were quite intent on replacing the trigger mechanism, which meant we had no need for a Savage rifle outfitted with their admittedly excellent Accutrigger system. And when you are looking for a cheap Savage action without an Accutrigger, what you really want is a Stevens 200; an older-style Savage action fitted with a standard trigger, all finished to what can be complimentarily called a "wallet-friendly sheen." In short, it's a solid action, stuck in an ugly plastic stock, with a pretty poor blued finish and a bog-standard trigger. That we happened across one with a couple of crucial bits already attached was just dumb luck.
So, with the rifle now accounted for, it was time to purchase one of the single most important parts of the precision-rifle puzzle: a new stock. Floppy, flimsy, and generally crappy-feeling, the plastic Stevens stock may be perfectly serviceable as a hunting stock, but it's certainly not something that one gazes upon with a sense of pride and it definitely doesn't boast any of the features we'd need in our long-range precision rifle. And thankfully, after taking stock (pun very much intended) of the offerings currently available on the market, our replacement seemed quite obvious: the Modular Driven Technologies TAC21. Why? Because just like the user-friendly, user-serviceable Savage action we'd selected, the MDT TAC21 chassis system too requires no gunsmithing time, while offering true chassis-level features at a gunstock price. What we mean by that is that the TAC21 locates the action in-line with the stock, as a good chassis should, and includes a detachable magazine system and a full complement of rail space, all at a price point that is either comparable or better than that of the various popular aftermarket stock and bottom metal combinations. And that it's Canadian-made just sealed the deal.
So in this, Part 1 of an as-yet unknown amount of parts, we outline the various steps involved in taking our new bone-stock Stevens 200, and installing it into the TAC21 chassis. Thereafter, we'd intended to take it to the range to test its accuracy, but were unable to do so as we found a couple issues with the rifle throughout the installation process... as one is wont to do with any used gun. First off, the stock trigger had been modified in such a way that the safety no longer functioned when installed in the TAC21 chassis, and as such will have to be replaced. But more importantly, we discovered that while the rifle had been advertised as a .308 Winchester, what actually arrived in our mailbox a week after we bought it was chambered in .243 Winchester, and we didn't have the opportunity to work up a .243 Winchester load before press deadline.
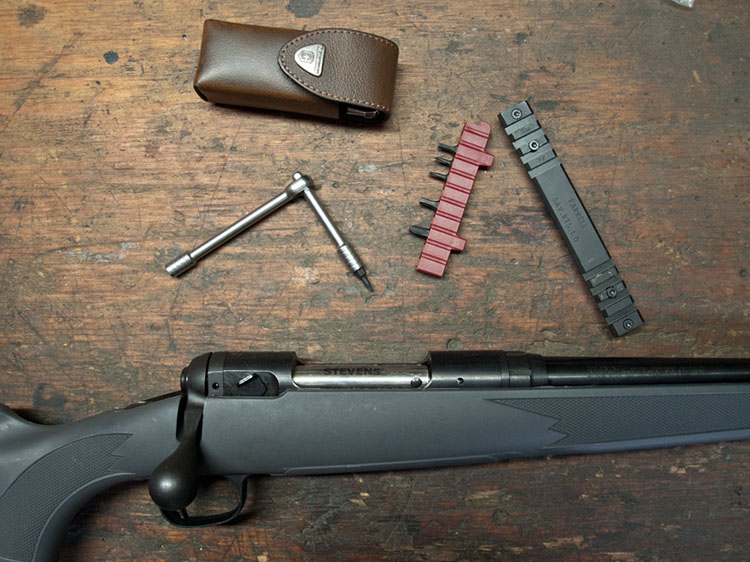 The first task at hand was to remove the Farrell mount. A great piece in and of itself, this will probably find a new home, with the proceeds going towards the purchase a new .308 barrel.
 With just three screws, the stock and action are seperated, leaving the trigger exposed. This pin here retains the trigger on the action itself, and must be driven out with a punch or drift.
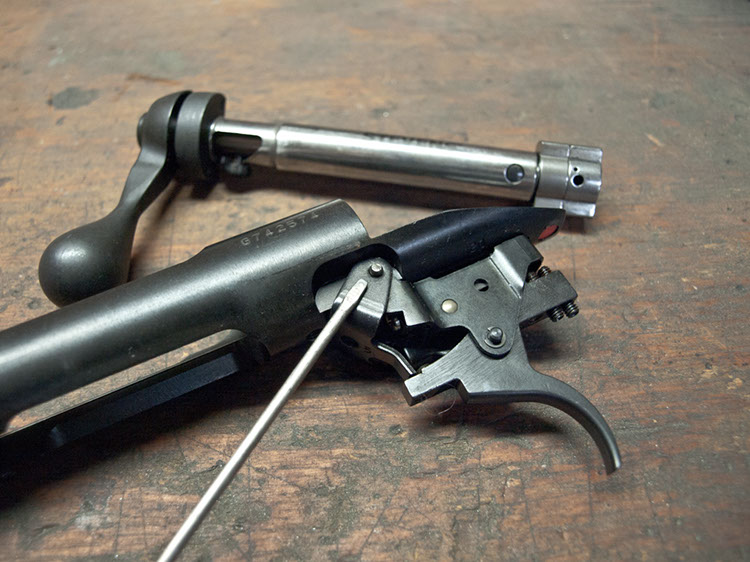
 ... but before you do that, take a gander at the flip side of the action and get a good look at that spring. First off, you must note the direction in which it is placed into the trigger mechanism, as it must be replaced in the same orientation as it was removed, and then you should place your finger over the opening (facing the camera here) while removing the pin as it can fly out and get lost once the pin’s removed. Our’s didn’t though.
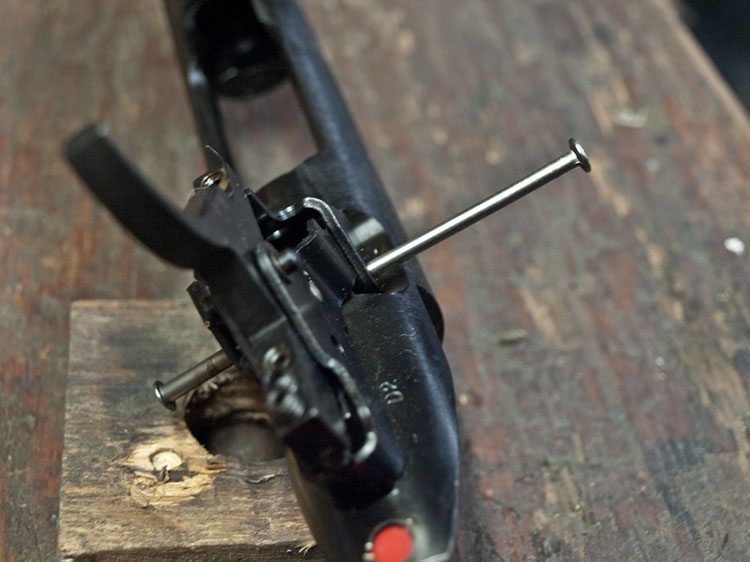 This is the trick to getting it all apart in manageable chunks; use a 2” common nail to drive the pin out, and then use the nail as a surrogate pin to hold it all together afterward. The longer, more readily-gripped nail allows you to slowly remove it by hand, and catch things like the spring, sear, and other components as you do. A small Phillips-headed screwdriver works equally well too, and allows for even more purchase and easier manipulation.
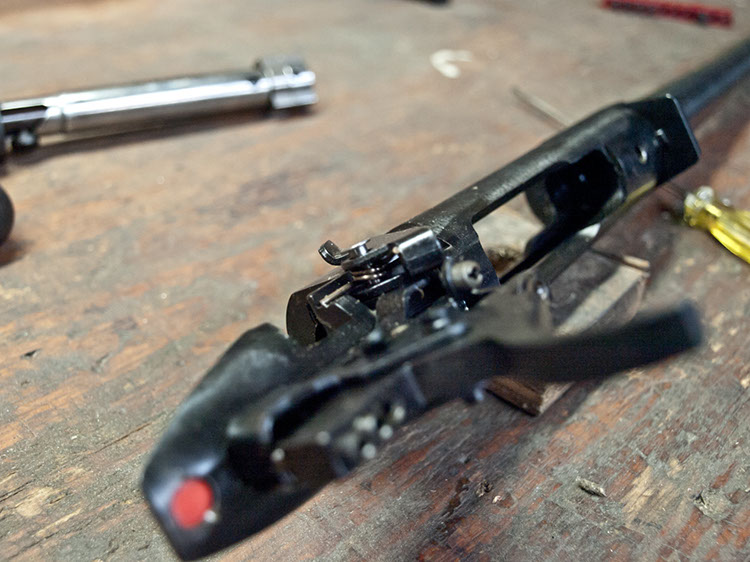
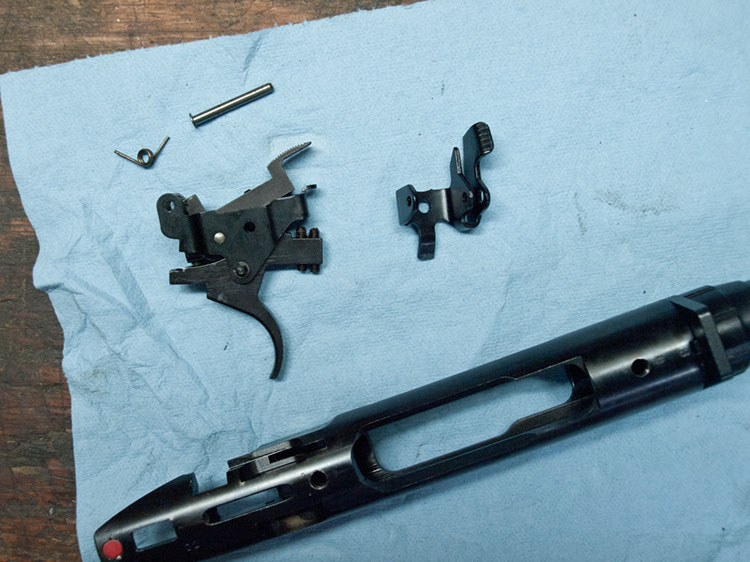 And if the whole thing falls apart in your hands, this is what you’ll see. The main takedown pin, sear/bolt release, and spring. We also had the safety fall out, which in turn releases the one small, shiny pin that’s still in the trigger mechanism in this picture. While not quite the same system as you’re liable to find in a more modern AccuTrigger-equipped Savage, the Steven’s trigger isn’t entirely dissimilar and the process remains largely the same.
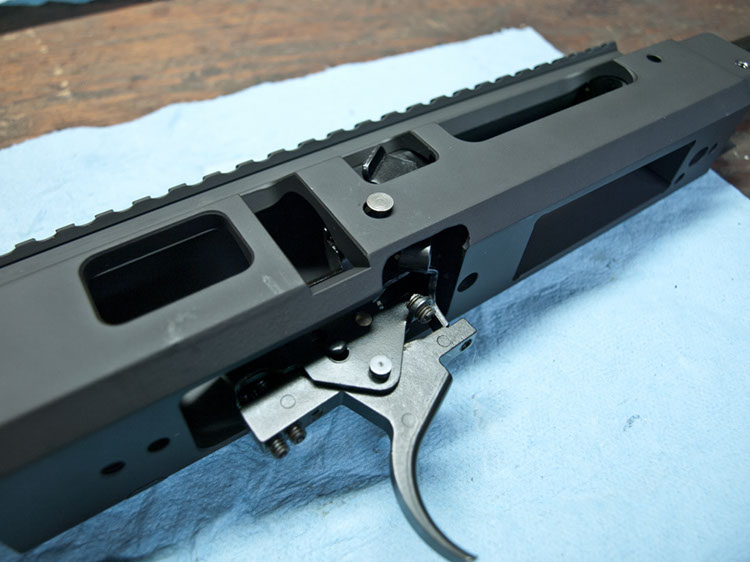
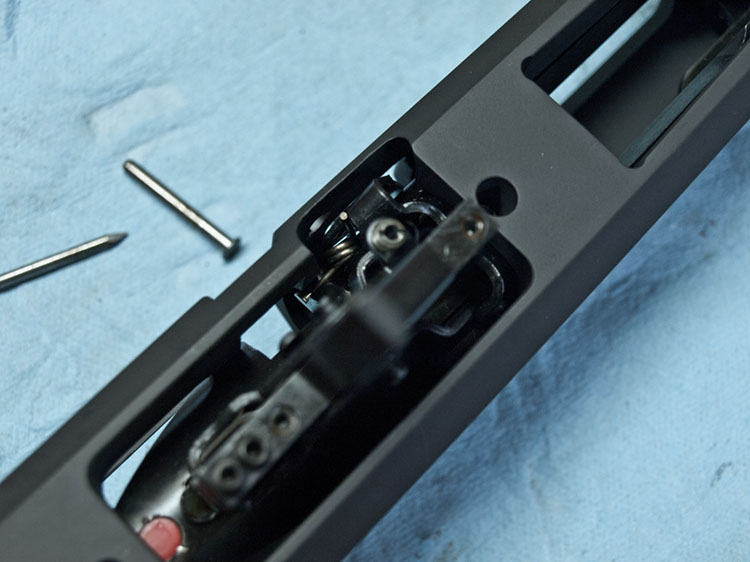 Now for the hard part. Hold the trigger components together, and place them into the chassis, ensuring the safety and tab on the rear of the trigger mechanism have been placed through the milled hole in the rear on the action, unlike what is pictured here where the tab is merely resting on the action. With an AccuTrigger-equipped gun, you must instead align the rear adjustment pin and spring with its corresponding divot in the action before proceeding.
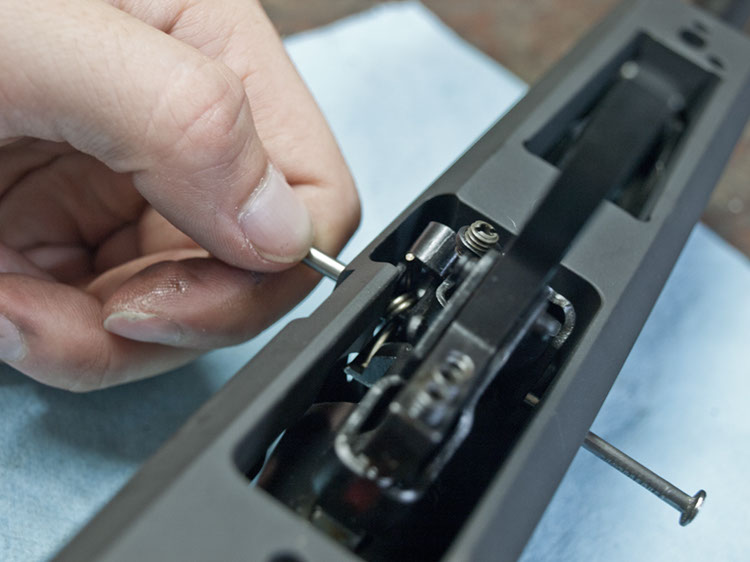 With that accomplished, you need to put the pin back in. Once again, the surrogate-pin technique works well here as it allows you to use the pointed end of a nail or a Phillips-headed screwdriver to position the spring properly, before pushing the takedown pin back through the other way. However, it is worth noting that many Savage rifles have inconsistent recoil lug widths, and some may be a tight fit in the chassis’ dovetailed forend.
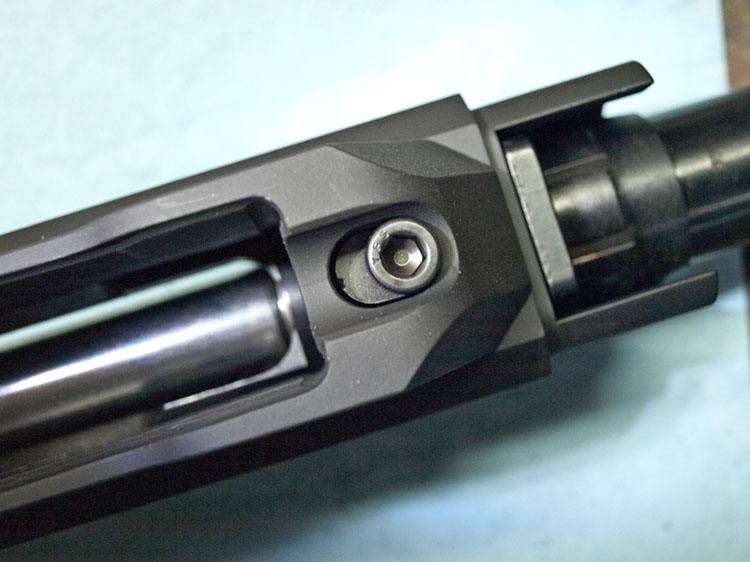
 Once the pin has been pushed through the majority of the trigger mechanism, you’ll find that its flanged head butts up against the access hole in the chassis. This is because the hole is offset, and requires that the action be moved in the chassis slightly to allow the flange to clear the hole. Once the action has been securely bolted in, this prevents the free-floating pin from backing its way out of the trigger mechanism.
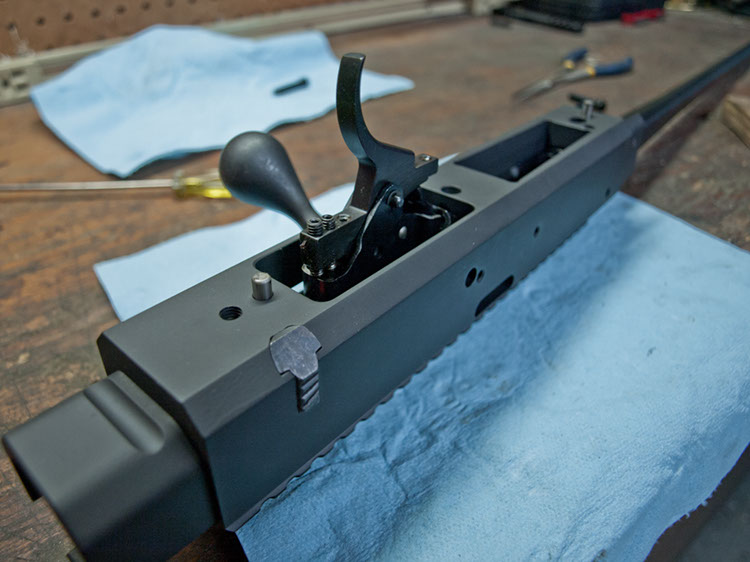 With the trigger mechanism assembled and affixed within the chassis, go ahead and slide the bolt in to give it a test, just to ensure the trigger’s working. Then, tap in the stainless steel trigger guard/magazine well locating pins, and insert the serrated steel tab that fits into the left side of the receiver. On our double Cerakote’d chassis, this required scraping some of the coating out with a drill bit. It’ll retain the buttstock takedown pin later.
 Once the pins have all been inserted, and the rifle tested for proper function, it’s time to attach the trigger guard/magazine well. Because Savage actions have utilized two different action screw spacings on their short actions, the front screw hole is oblong, and the hardware includes a washer of sorts that allows for the front action screw to be fitted either closer or father from the rear action screw. On our Stevens 200, it required the latter position.
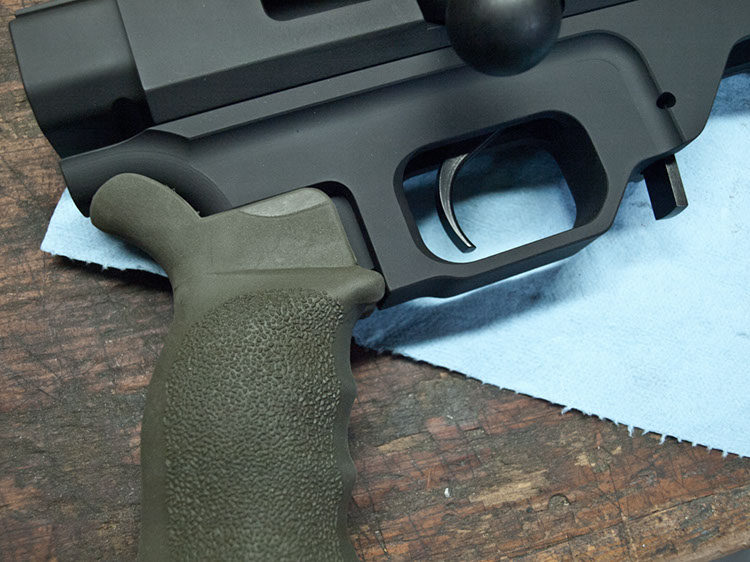 With the action screws in (and tightened to 65 inch-pounds while pressing the action rearward into the chassis), it comes time to fit furniture. For the pistol grip, we selected an ErgoGrip Deluxe grip in olive drab, due to both it’s hefty size and great texture. But, because of the MDT chassis features a wider trigger guard than is found on the average AR-15, we needed to do some trimming before it could be fitted.
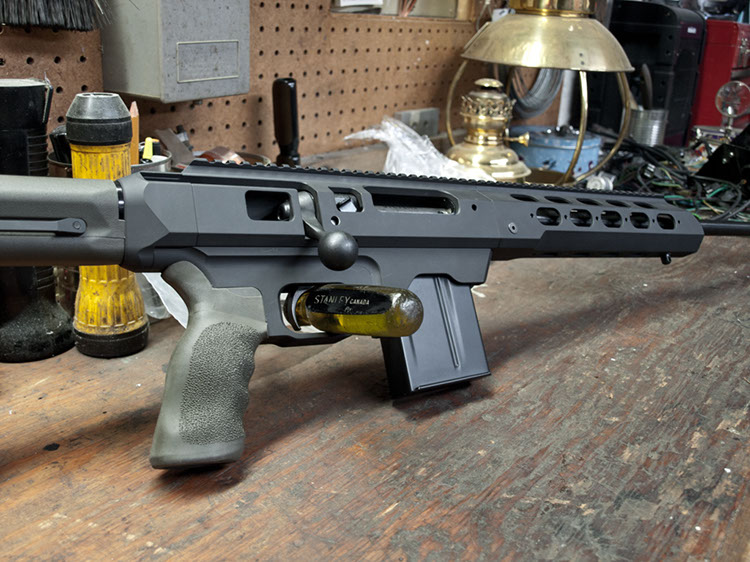 With the grip on, all that’s left is to fit an AR-15 stock of your choosing to the MDT stock adapter. In the next issue we’ll go over the installation of the MDT Magpul PRS stock adjustment kit, as well as move towards the installation of both an aftermarket trigger and barrel, in order to rectify the issues we currently have with our used Stevens 200. Check back next issue for an update and (hopefully) a range test!

 SUBSCRIBE TO CALIBRE MAGAZINE
$30.00 / year
SUBSCRIBE TO CALIBRE MAGAZINE
$30.00 / year
 UNAPOLOGETICALLY CANADIAN MEN'S T-SHIRT
$29.00
UNAPOLOGETICALLY CANADIAN MEN'S T-SHIRT
$29.00
 UNAPOLOGETICALLY CANADIAN WOMEN'S T-SHIRT
$29.00
UNAPOLOGETICALLY CANADIAN WOMEN'S T-SHIRT
$29.00